Consolidated Purchasing allows you to purchase merchandise for multiple branches on a single purchase order, bring the stock into a single branch, and then transfer it to the other branch locations. When the merchandise for other branches is received, the system can automatically print stock transfers to those branches for the merchandise.
Consolidated Purchasing uses the same purchasing logic as a regular Projected Purchase Order to determine the quantity that needs to be purchased for each warehouse, with the exception of consignment warehouses and your Drop Ship and Return Goods warehouses. Each warehouse is viewed separately and purchase quantities are adjusted individually. Finally, purchase quantities for each warehouse are combined to generate a single Purchase Order for the vendor.
You can choose to use consolidated purchasing on an order-by-order basis, and set a default in your Company Master.
Consolidated Purchasing Setup
There are a few fields that should be set before you begin using Consolidated Purchasing. In your Company Master, under the Purchasing/Inventory tab, there are two fields that should be set up:
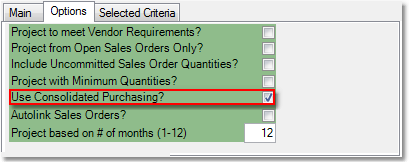
•Consolidated Purchasing for Projections (Y/N) - sets the default for your purchasing projections. You can change this on an order-by-order basis by checking or unchecking the "Use Consolidated Purchasing?" option under the Options tab in the Projected P/O screen (shown below).

•Consolidated Purchasing - Auto Print Stock Transfers - setting this field to a Y will automatically create the Stock Transfer(s) from the warehouse that will be receiving the items from the vendor to the additional warehouse(s), when the Purchase Order is saved. When any quantity of a product that was ordered for another warehouse is received, a window will pop up in the Stock Receipts screen prompting you to print the Stock Transfer(s). The transfer(s) will display the full amount of the product that you should be sending, but you can choose the quantity that you transfer at this time by filling it out on the receiving ticket when you pick the items.
To create a Consolidated Purchase Order follow the easy steps below. The projection will cycle through each warehouse to set quantities for each product by warehouse, then create a single Purchase Order with the total quantities.
1.Select Purchasing > Projected Purchase Order.
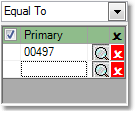
2.The Selection Criteria window will pop up. This allows you to focus the products included in the projection. To include all products, leave all fields blank and click the OK button in the bottom right corner of the window. Typically, you will choose to only include products assigned to a certain vendor. In the upper right corner of the window, enter the vendor in the Vendor No. field and press Tab. Check the box next to the Vendor No. header to only include products that have this vendor listed as the primary vendor. An example is shown below. For more information regarding selection criteria, see the Selection Criteria page.

3.Once you have entered your selection criteria, the Projected Purchase Order screen will open. No products will appear in the window until you enter some additional information. First, click on the Options tab in the upper right corner and be sure that the "Use Consolidated Purchasing?" box is checked off.
4.In the upper right corner of the screen, enter the reference code for the vendor that you are sending the Purchase Order to in the Vendor field and press Tab. Leave the Warehouse and Warehouse Buy Zone fields blank.
5.The Lead Time Days and Inventory Turn Cycles fields will be filled automatically based on the information in the Vendor Master. You can also enter them manually. To the right of these fields, you will notice the Display Zero Projected Items field. Checking this box will display products, based on the selection criteria, with a projected purchase quantity of zero. Leave this box unchecked if you do not want to display these products.
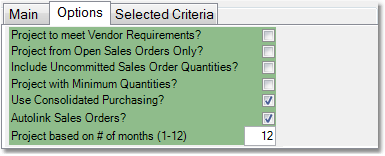
6. There are several additional options located under the Options tab. Click on any option in the example to the right for more information.
7. Once you have selected all of your options click the Go button. The Warehouse field will update with the last warehouse for your company. The window to the left will list all products that meet your criteria, along with current inventory figures and the recommended purchase quantity. To change the purchase quantity for a product, click in the Purchase Quantity field, enter the new quantity, and then press Tab.
8. You can click on any product in the window to view more information such as Item Cost, Minimum Stock, and Demand Trend %, as well as 12 and 24 month demand and sales information. This information will be displayed below the Go button. You can change the chart that you want to view using the drop down menu under the Options tab, under the Go button. |
|
9. When you have entered the purchase quantities for all of the items for this warehouse, click the Next Warehouse button in the lower right corner of the screen. The Warehouse field will update with the next warehouse and the products and quantities will update to reflect the needs of the new warehouse. Choose what to purchase for this warehouse, then click the Next Warehouse button to continue to the next warehouse.
10. When you have cycled through all of the warehouses, click the Display P/O button to display the total quantities that will be purchased. Then click the Create P/O button to create the Purchase Order.
11. In the Purchase Order screen, enter any additional information (Ship Via, Special Instructions, etc.) then click the Save button to save the P/O. If your system is set to autoprint the stock transfers, they will be created when the Purchase Order is saved and printed only when the merchandise is received. You can view and edit these transfers through the Stock Transfer screen. Any transfers that were created automatically for the consolidated P/O will say "Auto Generated" in the Comments section and reference the number of the Purchase Order.
