When inventory adjustments are saved, they will generate a posting to your default Inventory Change General Ledger account, specified in your G/L Control Table. The cost field that will be used to calculate the posting amount is specified in your Company Master, under the Pricing/Costing tab in the "Inventory Adjustment Cost Column (C1 to C7)" field.
The General Ledger account can be changed for a single product or for the entire adjustment, if necessary. For example, if you have a specific account for writing off goods damaged in your warehouse.
DDI recommends consulting with your accountant before posting adjustments to a different General Ledger account. Postings made to the incorrect account can be corrected with a Journal Entry.
To change the General Ledger Account follow the easy steps below.
1.Select Inventory > Inventory Adjustment.
2.Enter the date that you want the adjustment to take effect using the drop down menu in the Date field. If you want the adjustment to take effect at a future date, enter that date in the field, but be aware that your inventory will not reflect this adjustment until that selected date.
3.Enter your system initials in the Initials field and press Tab.
4.Enter the code for the warehouse that you want to adjust in the Warehouse field and press Tab, or use the ![]() to select the correct warehouse.
to select the correct warehouse.
5.Enter a reference for the adjustment in the Reference field. This reference will display in the General LEdger
6.In the Type section, select Inventory Adjusted or Inventory Physical. An Inventory Adjusted change will add or subtract from your current inventory amount. An Inventory Physical change will override and replace the Current On-Hand quantity.
7.Now in the window below, enter the reference code for the product that you would like to adjust in the Product field and press Tab.
8.The row will display the product's current inventory for On Hand and Committed quantities in the selected warehouse. In the Adjust Quantity field:
for Inventory Adjusted enter the quantity that you want to add or subtract from the Current On-Hand quantity
for Inventory Physical enter the quantity that you want to replace the Current On-Hand quantity
9.Right-click on the product and select "Change G/L Account" from the menu (shown below).

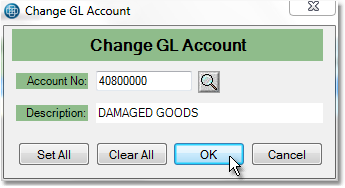
10.A window will pop up allowing you to select the appropriate account (shown below). Enter the account number or description in the Account No field and press Tab, or click the ![]() to browse a list of available G/L accounts.
to browse a list of available G/L accounts.

11.To set this as the G/L account for all of the products currently included in the adjustment, click the Set All button. This will only apply to products currently listed in the adjustment screen. To only set this as the G/L account for the selected product, click the OK button. The G/L account will be listed below each product (shown below). Any product that does not have a G/L account specified below it will be posted to the default Inventory Change account.
12.When you have entered all of the products, click the Save button in the bottom toolbar to post the adjustment.