The Stock Transfers tab in the Projected Purchase Order screen allows you to create a Stock Transfer from one warehouse to another instead of a Purchase Order to the vendor. This projection does not take into account the On Hand quantity of the product in the From warehouse, but instead looks at what the To warehouse needs based on demand, lead time and the product selection criteria entered at the beginning of the projection.
For example, if you select to include all items from a certain vendor and then project a stock transfer from warehouse 04 to warehouse 01, the system will calculate and display the quantities that warehouse 01 needs of products from the vendor, but it will not take into account the current quantities in warehouse 04. You can then choose to include the items on the transfer or remove the quantity and purchase the item from the vendor through a Projected Purchase Order.
To create a Projected Stock Transfer follow the easy steps below. The quantities to transfer are calculated using the same logic as the quantities on a Projected Purchase Order. You can review the factors of this calculation on the Projected Purchase Order page.
1.Select Purchasing > Projected Purchase Order.
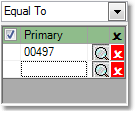
2.The Selection Criteria window will pop up. This allows you to focus the products included in the projection. To include all products, leave all fields blank and click the OK button in the bottom right corner of the window. For example, you may want to only include products assigned to a certain vendor. In the upper right corner of the window, enter the vendor in the Vendor No. field and press Tab. Check the box next to the Vendor No. header to only include products that have this vendor listed as the primary vendor. An example is shown below. For more information regarding selection criteria, see the Selection Criteria page.

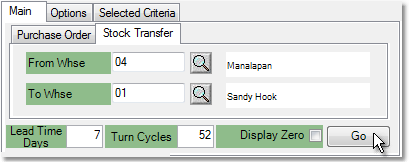
3.Once you have entered your selection criteria, the Projected Purchase Order screen will open. In the upper right corner, click on the Stock Transfer tab. Enter the warehouse that will be sending the merchandise as the From Warehouse and enter the warehouse that will receive the merchandise in the To Warehouse field.
4.By default, the projection will only display inventory and usage information for the To Warehouse. To include From Warehouse data as well, click on the Options tab, then check off the Display From Whse Info? checkbox. The On P/O + InTrns, Net Avail, and Monthly Avg fields will display the quantity for the To Warehouse / quantity for the From Warehouse.
5.Enter the Lead Time Days (the number of days that it takes the warehouse to receive the products once the transfer has been entered) and the Turn Cycles (the number of times per year that you transfer from one warehouse to another). An example is shown below.

6.Check off the Display Zero box if you also want the projection to display items that meet your search criteria but that the system does not think you need to transfer at this time. Uncheck this box to only see the items that need to be transferred. Then click the Go button.
7.The window to the left will list all products that meet your criteria, along with current inventory figures and the recommended transfer quantity in the Purch Qty field. Click on any product to update the information fields to the right that display cost, Minimum Stock Quantity and Demand figures. Change the transfer quantity by clicking in the Purch Qty field for the item and changing the number. Remove an item from the transfer by changing the quantity to zero.
Keep in mind that the quantity does not reflect the current availability in the From Warehouse. Use the Inventory tab in the bottom right corner of the screen to check if the product is available to be transferred. The From Warehouse will be highlighted in this window. If there is no availability, you can still enter the product on the transfer, but the item may be backordered.
8.Once you have entered all of the transfer quantities, click the Create Transfer button in the bottom right corner. This will take you to the Stock Transfer Entry screen, with all of the items and quantities that you selected entered into the transfer. Make any necessary changes to the transfer products or quantities and then click the Save button to save the transfer.