Adding an Image
All images added to emails must be internet based or they will not display for your customers. If you have an existing website, you can easily add an "Images" folder to that site. Upload your images to the folder using an FTP Client such as Filezilla or CuteFTP (both of these programs can be downloaded from the internet). Images that are not stored online will not display correctly for your customers.
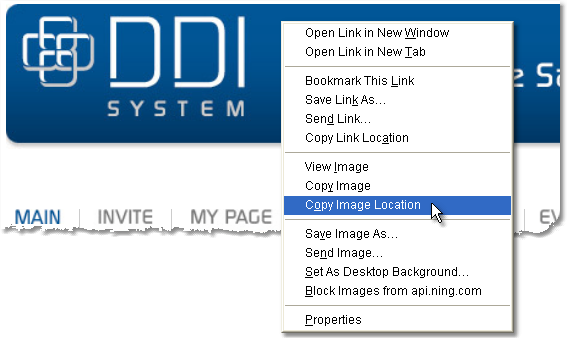
If they are already internet based, be sure that you have the full internet URL. You can also right-click on the image in your browser and select Copy Image Location from the drop down menu, then paste the location into the Picture Source URL field later (shown below).

1.Click on the Insert Image button ![]() .
.
2.In the pop up window, select Internet URL as the source of the image. Your image file must be internet based.
3.Enter the web address in the Picture Source URL field. If you have copied the image location from the web, you can right-click in the field and select Paste to insert the location. If you uploaded the image using an FTP Client or hosting site, you must enter the full URL for the image to function correctly. An example is shown below.

4.Always enter an Alternative Text for the image (shown below). This text will display in place of the image if it is blocked by the browser. If you do not enter an alternative text, a red "x" icon will display in place of the image.

5.Use the tools in the Layout section (shown below) to adjust the image's alignment, border, and size.

6.If you are resizing the image, we recommend only changing one of the size fields and unchecking the other to maintain the image proportions. For example, if you want to change the height, uncheck the Width option and enter your desired height. When you click the OK button, the image will resize the width automatically to maintain the original image proportions (shown below).

7.Finally, click the OK button. The image will appear in your email and you can move and re-size it. To re-open the image editing window for the image, click once on the image, then click on the Insert Image button again.