To create a Projected Purchase Order follow the easy steps below. You can also export the projection by clicking the Export to CSV button which will include the products,purchase quantities and inventory information. Once the order has been created, you can change quantity amounts and prices, and also add or delete products. When the order is created, you can choose to print, fax, or email it to the vendor.
1.Select Purchasing > Projected Purchase Order.
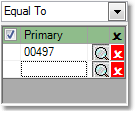
2.The Selection Criteria window will pop up. This allows you to focus the products included in the projection. To include all products, leave all fields blank and click the OK button in the bottom right corner of the window. Typically, you will choose to only include products assigned to a certain vendor. In the upper right corner of the window, enter the vendor in the Vendor No. field and press Tab. Check the box next to the Vendor No. header to only include products that have this vendor listed as the primary vendor. An example is shown below. For more information regarding selection criteria, see the Selection Criteria page.

3.Once you have entered your selection criteria, the Projected Purchase Order screen will open. No products will appear in the window until you enter some additional information. In the upper right corner of the screen, enter the reference code for the vendor in the Vendor field and press Tab. In the Warehouse field, enter the warehouse that you would like to order for; the projection will look at demand figures and product quantities for this warehouse only. Leave this field blank to include all warehouses. Drop Ship, Returned Goods and Customer Consignment Warehouses can not be selected.
You can also choose to select a Warehouse Buy Zone for the projection. This will look at combined demand figures and product quantities for all warehouses included in the buy zone. For more information on setting up buy zones, see the Warehouse Buy Zone page.
4.The Lead Time Days and Inventory Turn Cycles fields will be filled automatically based on the information in the Vendor Master. You can also enter them manually. To the right of these fields, you will notice the Display Zero field. Checking this box will display products with a projected purchase quantity of zero. Leave this box unchecked if you do not want to display these products.
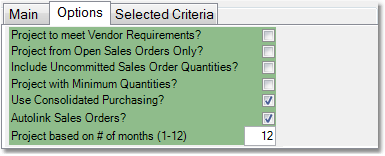
5. There are several additional options located under the Options tab. Click on any option in the example to the right for more information.
6. Once you have selected all of your options click the Go button. The window to the left will list all products that meet your criteria, along with current inventory figures and the recommended purchase quantity. To change the purchase quantity for a product, click in the Purchase Quantity field, enter the new quantity, and then press Tab.
7. You can click on any product in the window to view more information such as Item Cost, Minimum Stock, and Demand Trend %, as well as 12 and 24 month demand and sales information. This information will be displayed below the Go button. You can change the chart that you want to view using the drop down menu under the Options tab, under the Go button. Hover your mouse over any products to view any internal or external P/O comments for the product. |
|
8. When you have reviewed all of the products listed, click the Create P/O button in the bottom toolbar. (You can also export the projection by clicking the Export to CSV button which will include the products,purchase quantities and inventory information). This will open a purchase order for the selected vendor and enter all of the products with Purchase Quantity values into the Line Items tab.
If there are other open purchase orders in the system for the vendor, a window will pop up to give you the option to add on to an existing purchase order. Check to be sure that the status doesn't indicate that the PO has already been printed (P) or faxed or emailed (F) before clicking on the number to add to it. You can also click the New button to create a new PO. At this point, you can review the products, quantities, and prices again to make any necessary changes before you complete the purchase order.
9. After you have entered all of the necessary purchase order information, click the Save button in the bottom toolbar to save the order to the system. Now you need to send the purchase order to your vendor.
To fax or email the purchase order click the Send button to the left. In the Fax/Email window, select fax or email in the upper left corner. Then, enter the fax number or email address and click the Submit button. For more information about faxing and emailing, see the Fax/Email page.
To print the purchase order click the Purchase Order button to the left. The printer window will pop-up allowing you to select the correct printer and number of copies. Click the Print button to print the purchase order. Be sure your printer is turned on and connected and that you have enough paper loaded into the correct tray.
