Marketing emails can be created, saved, and edited ahead of time. You may want to designate a folder on a shared drive on your server for these emails, so that they can be accessed by users from any computer.
When you create and save emails before the date that you wish to send them, you can skip the Selecting Customers and Verifying Customer Information steps, as you will not be sending the message. The selection criteria information is not saved with the email message.
For design purposes, it may be easier for you to create your template outside of the Marketing Manager, in a program such as Microsoft Expressions, and then open the template in inform when you are ready to send it. Any templates created outside of Marketing Manager should be saved as .html files.
When you compose a mass marketing email, there are several federal regulations that require you to include certain information. For example, your email must:
•be identified as an advertisement
•include your company name and valid physical postal address
•give the recipient the option to unsubscribe from future emails
It is the user's responsibility to review and comply with any email marketing regulations. More information can be found here.
When the email is sent, the system delays 1-2 seconds between each message so that your email account does not get flagged for spam.
In order to test your email, especially for those with pictures, links, and attachments, you should always send a test email to a test customer before mass mailing.
Check out the Tips, Tricks & Ideas page for information on avoiding spam filters, finding templates and targeting customers.
HTML and Design
In the main window, you have a Design tab and an HTML tab. As you compose your marketing email, the design tab will reflect the visual appearance of the email and the HTML tab will update to display the backend HTML code. You can edit the email using either option. DDI Customer Care does not support HTML-specific questions, but we can recommend HTML design services for this purpose. We recommend contacting your web designer if you are not comfortable using HTML.
Composing the Email
1.Be sure that the Export to CSV box has been un-checked, then click the OK button in the bottom toolbar.
2.The Inform Marketing Mail Sender window will pop up. Choose the format that you will use to create your email by selecting either the HMTL tab or the Plain tab. Note that plain text emails cannot be saved.
3.Enter the text that you want to include in the text window. For more information on HTML features, including adding images, attachments, and hyperlinks, see the HTML Email Features page.
Saving the Email
1.Once you have composed the email, or at any time during composition, you can save the email by clicking on the Save button ![]() . Be sure to save it to a shared drive on your company's server if you want to be able to access the file from any connected computer.
. Be sure to save it to a shared drive on your company's server if you want to be able to access the file from any connected computer.
2.Name the file and click the Save button to save the file.
Note: Plain text emails cannot be saved. For HTML emails, the Subject line and any attachments will not be saved with the email text.
Opening a Saved Email
1.Click on the Open button ![]() .
.
2.Then locate the correct file and double-click on the file name. This will open the file and allow you to make changes or send it to customers.
Sending the Email
Before sending the email to your customers, you need to send the email to a test customer contact to verify that it displays correctly. Select only your test customer and follow the steps below. Check the email to verify that you have received the message and that it displays correctly, then send it to the selected group of your customers.
1.Once you have selected your customers, verified their information, and composed your email, you are ready to send it. First, enter a subject in the Subject line. Then, attach any files that you want to send with the message.
Remember that the email will be sent from the email of the user that you are logged in under, so change the user before you send the email if you would like it to be sent from a generic address. The user that you are logged in as must have a valid email address listed in their User Master.
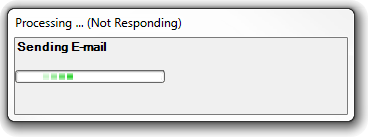
2.Finally, click the Send button to send your email. The system will display a message that it is not responding (shown below).

This is normal and may take some time to process. Do not close inform or attempt to force quit the program. When the messages have sent, a window will display indicating how many emails were sent. If you receive an error message, save your email draft and check to be sure that all of your company settings are correct (see Company Setup for help with this).