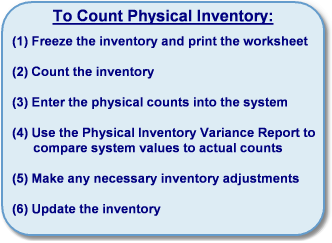
The Physical Inventory screen allows you to freeze, count, and update your on hand inventory values for selected products in a warehouse. There are six steps in the physical inventory counting process (shown below). Click on any step to view instructions, or scroll down to take the process one step at a time.
Keep in mind that freezing your inventory takes a snapshot of your On Hand, Committed or Ship Confirmed, On P/O and On Transfer quantities of the products. The quantities displayed in the count sheet will not update if transactions occur while the inventory is frozen. If you are freezing large sections of your warehouse, we strongly recommend freezing and counting your inventory outside of your normal business hours. Run your invoicing for any delivered orders and complete your receiving for any received merchandise before beginning.

To count physical inventory follow the easy steps below. If possible, you should avoid posting transactions that will affect inventory amounts (invoicing, stock receipts) once you have frozen the inventory.
(1) Freeze the inventory and print the worksheet
1.Select Inventory > Physical Inventory.
2.Select the warehouse that you will be counting inventory for from the Warehouse drop down menu. You can only count inventory for one warehouse at a time.
3.Select the type of products that you will be counting from the Type drop down menu (typically "All Products"). Then, click the Freeze button.
4.The Selection Criteria window will pop up allowing you to focus the products included in the count. Enter any additional selection criteria and click the OK button. If you would like to include all products, leave all fields blank and click the OK button. For more information, see the Selection Criteria page.
5.This will open the Physical Inventory Entry window and list the products that were included in the freeze, sorted by Physical Inventory ID. To choose how your count sheets will be sorted, click the Exit button in the bottom right corner of this window. Click once on the frozen batch to select it, then click the Entry & Worksheet button in the bottom toolbar. Choose how you would like the products to be organized using the drop down menu in the Sort By field (upper left corner). Once you make a selection, the system will display a list of products to be counted. The small box to the right will tell you how many pages of products are included in the count. Use the buttons to move to the next page, previous page, or type in a number and click the Go To Page button to jump straight to that page.
6.Click the Print Worksheet button to print the Physical Inventory Worksheet so that you can count your products. This worksheet will display product information, as well as bin location and a blank Counted field. If you would like to hide the current On Hand quantities for the products, please contact DDI Customer Care (p: 203.364.1200 e: support@ddisys.com) to adjust your system settings. You can close this window while you count the inventory by clicking the Exit button in the bottom right corner. You will not be able to open any other windows while the Physical Inventory Worksheet is open. You can re-open the worksheet when you have finished counting the inventory.
7.Use the Physical Inventory Worksheet that you just printed to note the quantity on hand of each product on the worksheet. Enter this number in the Counted field on the worksheet.
(3)Enter the physical counts into the system
8.If you closed the Physical Inventory Worksheet window you will need to re-open it to continue. To do this, return to the Physical Inventory screen through the Inventory menu. In the window, click on the warehouse that you froze, then click the Entry & Worksheet button in the bottom toolbar. Select the same sort option in the Sort By field. Leaving any count field blank will result in an updated quantity of 0 for the product.
9.Using the count information that you wrote on your Physical Inventory Worksheet, enter the counted on hand quantity for each product in the Counted field. This number will replace the number that is currently in the On Hand field when you complete the update. You can also enter or change bin location information. Depending on your company settings, the count sheet will either display the qty of the product that is committed or the quantity that has been ship confirmed. This flag can be set in the Company Master, under the Inventory tab: "Physical Inventory Worksheet Show (C)ommitted or (S)hip Confirmed". Click on any field in the example below for more information.

10.If you want to add a product to the count, click the Add button in the bottom toolbar (assembly products cannot be added to the count sheet). Enter the product number, counted on hand quantity, and bin location in the window, then click the Save button. You must enter a counted quantity in order to save the product to the count sheet. The added product will appear at the very end of the products listed.
11.You can also choose to set all negative on hand inventory values to zero by clicking on the Set to Zero button. A zero will be entered in the Counted field for all products listed on the screen.
12.Once you have entered the counted on hand quantity for each product, click the Save button to save the counts.
(4) Use the Physical Inventory Variance Report to compare system values to actual counts

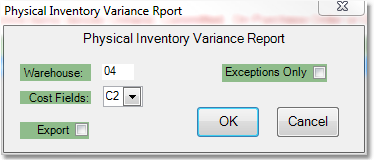
13.Now click the Report button in the bottom toolbar to print the Physical Inventory Variance Report. This will allow you to compare the system values to the actual inventory counts.
14.Select the cost field that you want to display from the Cost Field drop down menu. This will be used to calculate the Variance Dollars for products with on hand inventory discrepancies.
15.Check the Exceptions Only box to only include products where the counted quantity was different from the amount in the system.
16.Click the OK button. The printer window will pop up. Select the correct printer and number of copies, then click the Print button. You can also view the report on screen by clicking the View button. The report can also be exported to a spreadsheet by checking the Export box before clicking the OK button.
(5) Make any necessary inventory adjustments
17.Review the report and identify any products with variance quantities. For products with on hand quantity discrepancies, you may need to count the inventory again. To edit the counted quantity, go back to the Physical Inventory Entry window by clicking on the name of the warehouse, and then clicking the Entry & Worksheet button.
18.Make any necessary changes to products with variance amounts.
19.When your changes are complete, click the Save button. Print the Physical Inventory Variance Report to identify any discrepancies.
20.Click on the warehouse in the window.
21.Then, click the Update button in the bottom toolbar. A window will pop up asking you to run the Physical Inventory Variance Report before updating. Click the Yes button to continue if you have already run the report. The system will then update the inventory and the warehouse will be removed from the window.
![]()