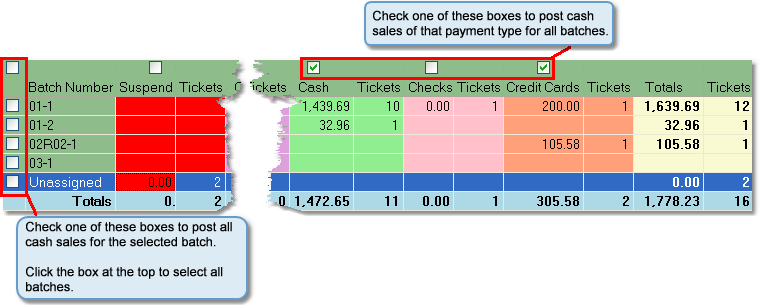
The Point of Sale screen allows you to post cash sale transactions to Accounts Receivable by Batch Number or Payment Type. You can also use this screen to view or print a report of the postings for your records by clicking the Report button in the bottom toolbar.
To post Point of Sale transactions follow the easy steps below. After the system posts the transactions, it will automatically open the printer options window so you can print a report of the posted transactions for your records. Once you print the report, the posted values will be cleared from the screen and only values that were not posted will be displayed.
1.Starting from the main screen, select Sales > Order > Point of Sale.
2.The screen will display all un-posted point of sale transactions organized by Batch Number and Payment Type, like the example shown below. Select the appropriate payments by Batch Number or Payment Type. If you select a Batch Number and a Payment Type, only values that match both selections will be posted.

3.Select a batch or payment type that you want to count and post for the day, then click the Report button in the bottom toolbar. Select the appropriate printer and number of copies, then click the Print button.
4.Take the report over to the cash drawer and verify that your amounts match for each invoice. If any of your invoices do not match correctly, you must either suspend or correct them before posting the batch.
To correct an order: pull up the order in the Sales Order screen. Click the Edit button in the bottom toolbar. Make any changes to the order that are necessary. Then, click the Save button in the bottom toolbar to re-save the order. You should also refresh the Point of Sale screen and print another report for the batch.
To suspend an order: pull up the order in the Sales Order screen. Click on the Final tab, then click the Edit button in the bottom toolbar. In the Payment Type field (located to the right of the Tax field) select "Suspend". This will remove the order from the posting batch and set the Cash Tendered to zero. Then click the Save button in the bottom toolbar to re-save the order. When you are ready to post the order, you can change the Payment Type field back to the correct entry and it will reappear in the batch to post.
5.When you have verified that your cash drawer balance matches the report, click the Post button in the bottom toolbar. A window will pop-up asking you if it is okay to post the selected values. Click OK.
6.Once the transaction values have been posted, the printer window will pop-up so that you can print a report of the posting for your records. This report will also include the G/L Distribution for the posting. From the printer window, select the appropriate printer and number of copies. You may also preview the report before you decide to print it by clicking the View button. This will open a preview of the report in a new window. Click Print to print the report. Remember to check that your printer is turned on and connected, and that you have inserted a sufficient amount of paper into the correct printer tray. You may also fax or email this report by clicking the Fax/Email button. For more help faxing or emailing the report, see the Fax/Email Reports page.
7.Once you have printed the report, the Point of Sale screen values will be adjusted to reflect your posting. Only values that have not been posted will remain on the screen.
![]()