When you select Check Print from the Accounts Payable menu, the system will automatically bring you to the Batch Check screen. You can also access this screen by clicking the Batch Checks button in the toolbar at the bottom of the screen. Be sure to select the type of check that you want to print before checking off invoices to apply the check to.
To print batch checks follow the easy steps below. Before printing your checks, be sure you have enough check paper inserted into the proper tray of the designated printer. This screen allows you to manually build a batch of checks by selecting the vendor and invoices that you want to pay. You can also print individual checks for vendors or enter invoice payments made via hand check.
Batches are organized according to the bank account that the checks will be printed from. You can build check batches for multiple banks at the same time by changing the G/L Bank Account in the upper left corner of the screen. The number of checks scheduled in the batch and the total payment amount will adjust according to the account that you select. Be sure that you have selected the correct account before adding a check. Click the Report button in the lower left corner of the window to print or view a report of the invoices scheduled to be paid in the batch.
Remit-to Vendors
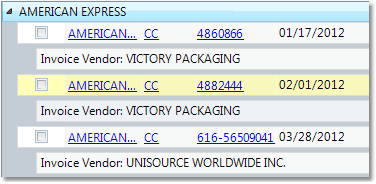
Invoices assigned to Remit-to Vendors will display under that Remit-to Vendor in the Check Print screen. For example, vendor invoices remitted to American Express will display under the American Express vendor. The vendor that the merchandise was purchased from will display as the Invoice Vendor when the Remit-to Vendor is expanded. An example is shown below.
1.Select Accounting > Accounts Payable > Check Print.
2.The screen will display a list of all vendors with open invoice balances, with the total open balance displayed in the far right column. Balances displayed in red are credit balances.
3.Click the Edit button in the bottom right corner to begin building your batch. The screen will default to batch print. If you need to issue an individual check, or record a hand check payment, click on the Options button in the lower left corner of the window. You can also check the box to Accept Past Due Discounts here, which will apply discount amounts to invoices regardless of the discount date.
4.Before adding checks to your batch, be sure that you have selected the correct G/L Bank Account and set the correct Check Date in the upper left corner of the window.
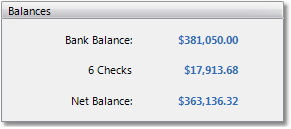
5.There are several ways to add invoices to the batch. As you select invoices to pay, you will see the number of checks and total check amount display in the upper right corner, along with the current Bank Balance and Net Balance after the checks are issued.
•Individually - You can drill down to view individual invoices for a vendor by clicking on the small triangle directly to the left of the vendor's name (shown below).
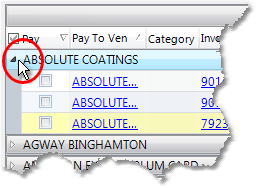
Checking off the box to the left of the Pay To Vendor field will display the full open balance of the invoice as the Pay Amount. If there is a discount available, the discount will be applied based on the Discount Date for the invoice. The batch can be defaulted to accept all discounts, even if it is past the discount date, by clicking on the Options button in the lower left corner and checking the Accept Past Due Discounts box. The Pay Amount can be adjusted by clicking on the amount in the field and entering a new amount to pay.
•By Vendor - Add all open invoices for a vendor to the batch by right-clicking on the Vendor Name and selecting Select All for Vendor from the drop down menu. This will check all open invoices for the vendor to be paid in full. Payment amounts can still be adjusted by expanding the vendor (right-click > Expand) and adjusting the amount in the Pay Amount field.
•Using the Filter - Use the Filter option built into the Check Print screen to select only invoices that meet certain criteria. For example, select only invoices with a Discount Date on or before a selected date. To filter, click on the Filter icon in the right corner of the window, above the Balance field (shown below). The Filter bar will appear below the column headings. For date fields, click on the down arrow to select a date from the drop down calendar (shown below).

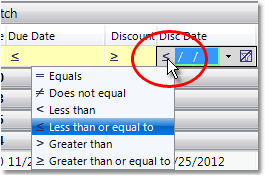
All date fields are set to use "Less than or Equal to" criteria. When you enter a date into the field, the screen will only display invoices less than or equal to that discount, invoice, or due date. Change this setting by clicking on the symbol to the left of the date (shown below) and selecting the appropriate option from the drop down menu.
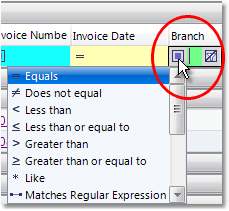
For non-date fields, the default criteria is "Contains". Change this setting by clicking on the symbol to the left of the field (shown below) and selecting the appropriate option from the drop down menu. For example, if you only want to include invoices for a specific branch, set the criteria in the Branch field to "Equals" and enter the reference code for the branch.
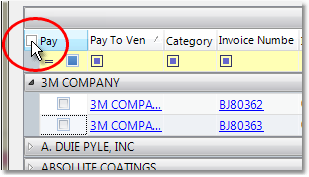
Once you have filtered the screen to display all invoices that you want to pay, you can click the box to the left of the Pay column heading to select all invoices displayed (shown below). You can also check each invoice individually by expanding the vendor (right-click on vendor name > expand) and checking off the individual invoices.
The batch can be saved at any time by clicking the Save button in the bottom right corner of the screen. Individual checks and hand checks can still be entered while a batch is scheduled, provided the vendor for those checks is not included in the current batch.
6.Once you have selected all of the invoices to pay, the Balances section in the upper right corner will display the total number of checks that will print, the total dollar amount that will be removed from the bank, and the new Net Balance for the bank account once the checks have cleared. Click the Save button to save the batch.
7.Review the checks scheduled at any time by filtering the screen for selected invoices or by clicking the Report button in the bottom left corner and printing or viewing the Scheduled Checks Report. This will include all invoices scheduled to be paid, as well as the total for the batch. The report can only be printed once the batch has been saved.
8.When you are ready to print the checks, first make sure that you have inserted enough check paper into the proper tray of the printer. Click the Print button in the lower right corner of the window, select the appropriate printer from the drop down menu and click the Print button to print the checks.
9.Once all checks have printed, the system will ask you if all checks printed correctly. Answer "Yes" in this window. If the checks did not print correctly, you will need to void the checks that printed incorrectly through the Check Payment Inquiry screen.