The Report button in the lower left corner of the Product Master window allows you to create and run product reports on the fly. Reports can be viewed on screen, exported to Excel, printed, faxed, emailed, or saved.
Create and Run a Product Report
1.Select File > Product > Master.
2.Click the Report button in the bottom left corner of the window. The Selection Criteria window will pop up, allowing you to select the group of products that you would like to include. Enter the desired criteria, then click the OK button. You can also leave all fields blank and click the OK button to include all products in the report. For help using the Selection Criteria options, see the Selection Criteria screen.
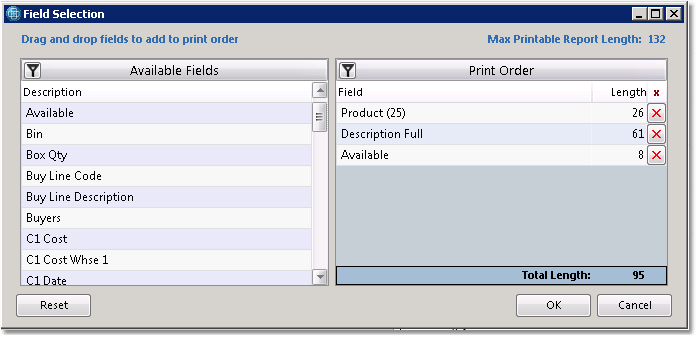
3.The Field Selection window (shown below) will ask you to select the information that you would like displayed about each product. All of the available product fields are listed under the Available Fields section on the left. Add fields to the report by clicking and dragging them to the Print Order section on the right. You can also double-click on the field. Fields will display from left to right on the report and can be dragged up or down in the order. Remove a field from the report by clicking on the ![]() to the right of the field. As you select the fields to include, the Total Length of Fields Selected will recalculate. If you will be printing the report, do not exceed 132 in length or some of the columns will be cut off. If you are exporting the report to a spreadsheet, you can exceed this number. Select the appropriate fields and click the OK button. Click on any field in the example below for more information.
to the right of the field. As you select the fields to include, the Total Length of Fields Selected will recalculate. If you will be printing the report, do not exceed 132 in length or some of the columns will be cut off. If you are exporting the report to a spreadsheet, you can exceed this number. Select the appropriate fields and click the OK button. Click on any field in the example below for more information.

4.Click the OK button to run the report.
•Print - select the appropriate printer and number of copies. If you do not see the printer listed, check off the Show All Printers box to view all Inform printers. Check the Collate box to collate the report when printing more than one copy. Click the Print button to print the report.
•View - click the View button to view the report to the screen.
•Save as PDF - click the View button to view the report to the screen. In the upper left corner of the view window, select File > Save As... from the menu. Browse to a location to save the document. Enter a name for the document. Click the Save button to save the document as a PDF.
•Export - click the Export button. In the pop up window, browse to a location to save the document. Enter a name for the document. Click the Save button to export the spreadsheet. You can then browse to the file location to view the document.
•Fax/Email - click the Send button. Choose Fax or Email from the drop down menu in the upper left corner of the window. If you want to send this to a Customer or Vendor contact, choose Customer or Vendor from the Method drop down menu and enter the company name in the Company field. Select the appropriate contact from the Name drop down menu, or click the New butt