The Prospect Master allows you to create, update, and track prospective customer accounts and contacts. Prospect accounts can be created through the Prospect Master or by importing information from a spreadsheet using the Prospect Import screen. See the Prospect Import page for more information regarding importing and updating prospect information using a spreadsheet.
Prospects can be: •assigned to a salesperson •issued Price Quotes •associated with contacts •converted to customer accounts •selected for reports |
Prospects cannot be: •issued Sales Orders •issued credits •used to receive payments |
Searching for Prospects
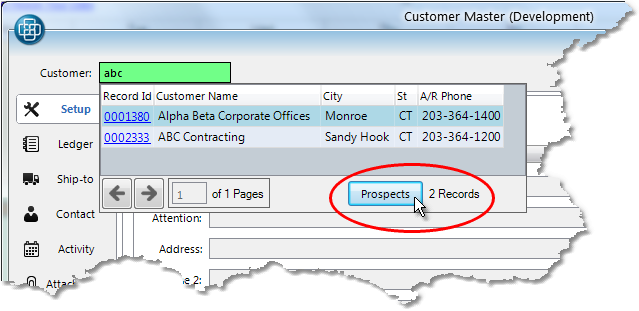
Prospective accounts are separated from the Customer search, similar to the way non-stock products are separated from the Product search. In addition to the Prospect Master screen, prospect accounts may be part of the search results in the Customer Master and Sales Order screens. In the Sales Order screen, the Price Quote checkbox must be checked in order to display prospects when searching. If there are prospect accounts that meet your search criteria, a Prospects button will display to the right of the search field in the window (shown below). Click on this button to view and select from prospect accounts.

Creating a Prospect
Prospects can be created through the Prospect Master screen or through the Customer Master. The instructions below apply to the Prospect Master screen only. To create a prospect in the Customer Master, simply set the Status in the upper right corner of the screen to "Prospect". Prospect accounts must be created before contacts for the account can be added. Follow the steps below to create the account and then add contacts through the Prospect Master screen.
1.Select CRM > Prospect Master.
2.Click the New button in the bottom right corner of the screen.
3.Your system may assign the Prospect Number automatically, which you can see in the Prospect field in the top left corner of the screen. If not, enter an alphanumeric reference code and press the Tab key.
4.Enter the name of the prospective account in the Name field. This should be the name of the company, not the name of your contact.
5.If you have additional information regarding the account, such as their address, website, or the salesperson the account should be assigned to, you can enter it at this time. You may want to also enter the name of the person or company who referred the prospect in the Referred By field, as well as a Rating to indicate their potential. These fields can be used for reporting.

6.Click the Save button in the bottom right corner to save the prospect account.
7.Once you have saved the account you can add contacts to it. Pull up the account in the Prospect Master screen and click on the Contact tab on the left side of the window. Click the Add Contact button in the bottom left corner of this window.
8.This will open the Contact window and allow you to enter any necessary contact information, including name, email address, phone number, and title.
9.Once you have entered all of the information for your contact, click the Save button in the bottom right corner of the window to save the contact. Enter as many contacts as necessary for the account.
Converting a Prospect to an Account
1.Select File > Customer > Customer Master.
2.Search for the prospect account by entering search information into the Customer field. Click on the Prospects button at the bottom of the search window to view your prospect accounts (shown below) and select the appropriate account from the list.

3.Click the Edit button in the bottom right corner to edit the prospect account.
4.Click on the drop down menu in the Status field in the upper right corner of the window and choose the appropriate credit status for the prospect's customer account. All options are listed below.
Active/Good - allows for the entry of Sales Orders, quotes, and payments.
Watch - all orders will be placed on Credit Hold, regardless of their credit limit or open number of invoice days.
C.O.D. - prints "C.O.D." in bold letters in the heading of Sales Orders and Shipment Confirmations. Also prints the C.O.D. amount to collect on the Truck Manifest.
Legal - prevents entry of Sales Orders and Price Quotes. Payments can still be accepted through Cash Receipts Posting.
Hold - allows for the entry of Price Quotes, but not Sales Orders. Payments can still be accepted through Cash Receipts Posting.
Cash in Advance - all orders will be placed on Credit Hold, regardless of their credit limit or open number of invoice days. Prints "P.I.A." in bold letters in the heading of Sales Orders and Shipment Confirmations.
Inactive - prevents entry of Sales Orders and Price Quotes. Payments can still be accepted through Cash Receipts Posting.
Credit Card - prints "Credit Card" in bold letters in the heading of Sales Orders and Shipment Confirmations.
Prospect - prospective accounts can only have Price Quotes entered and do not have any credit information on their account. Prior to placing an order, the prospect must be converted to a customer account by changing the Status to the appropriate option.
5.Once you have selected a new status for the customer's account, click on the Credit tab to enter their Terms, Tax Code, and Credit Limit.
6.Click on the General tab to assign the account to a Category and Salesman. Review the additional settings under this tab and adjust them as necessary. For example, in the upper right corner of the General tab, you can choose how the customer will receive their invoices and order confirmations. For more information on fields within the Customer Master, see the