To reconcile your bank statement follow the easy steps below. Be sure that the balance you enter corresponds to the selected bank account. For help setting up a bank account, see the Bank option in the Company section of the system.
1.Select Accounting > Bank Reconciliation > Bank Reconciliation.
|
2. The system will automatically enter the default bank account number in the Bank G/L # field. Check to verify that this is the account that you want to reconcile. If it is the correct account, press Tab to move to the next field.
3. In the Closing Date field, enter the closing date of your bank statement. You can do this using the drop down calendar, or by manually typing in the appropriate date.
4. Now enter the balance shown on the statement into the Balance field and press Tab. Then, click the OK button in the bottom toolbar. |
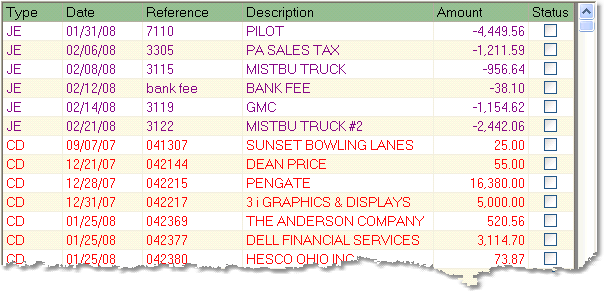
5. The system will display your Opening Balance to the right. The balances for Journal Entries, Deposits, and Disbursements, will update as you clear transactions in the window (shown below. The Reconciled Balance will also adjust to reflect the transactions that you clear. In the window below, it will display all open transactions for that bank account. Double-click on any transaction to view additional details.

6. Clear transactions by checking the box in the Status field. This will update the balances in the upper right corner of the screen. You can also click the Clear All button to clear all transactions, or the Unclear All button to re-open all transactions.
To clear a transaction, right-click on the transaction and select Clear.
To make an adjustment first click the Save button in the bottom toolbar to save your reconciliation. The system will prompt you that you are out of balance. Save the reconciliation and exit. You can make your adjustments as General Ledger journal entries or as Cash Receipts. Once you have completed your adjustments, re-open the reconciliation. Reopening the reconciliation will recreate the list of transactions to include your adjustment entry or entries.
7. Once you have reconciled your statement balance with your balance in the system, click the Save button in the bottom toolbar. A window will pop up asking if you want to save the reconciliation temporarily or permanently.
Saving a reconciliation temporarily will save the transactions that you have marked as cleared. You can exit the screen and pull up the reconciliation again to make any changes before saving it permanently.
Saving a reconciliation permanently will remove the cleared transactions from the window and print a final reconciliation report for the account.
