|
The new Truck Manifest (Beta) screen allows you to drag and drop orders to schedule them on trucks and rearrange their stop order. You can also Ship Confirm orders right from the screen and view total weight and volume for each truck. To access the beta screen, click on the Beta Screen button in the lower left corner of the Truck Manifest screen. |
First, enter the branch and Ship Date then click the Search button in the bottom toolbar.
The left side of the screen will display the available orders that are not already scheduled on a truck. For an order to be displayed in this screen it must have:
•a Ship Via that is marked as "Delivery". This will exclude orders marked for customer pick up or will call.
•a Ship Date that matches the selected Ship Date. Orders with a blank Ship Date will also be included, as long as they have a delivery Ship Via.
•a Shippable Quantity greater than 0. Orders that are completely backordered will not appear.
Sort the orders displayed by clicking on any of the headings. Click once to sort in ascending order and click again to sort in descending order.
The right side of the screen will display the available trucks that the orders can be schedule on, as well as any orders that are currently scheduled on those trucks. For a truck to be displayed in this screen it must be attached to a Ship Via code. Create a Ship Via code for the truck using the Ship Via screen. Click the New button in the bottom toolbar to create the Ship Via code, then link the truck to the Ship Via through the Truck field in this screen. For more help, see the Create a Ship Via page.
Each truck displays the total weight and volume to the right, along with the total number of stops.
For more information about an order, click on the hyperlink Order Number, or right-click on the order and select Inquire from the menu. This will open the Sales Order in a separate window.
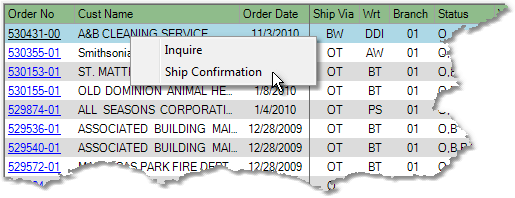
To Ship Confirm an order, right-click on the order and select Ship Confirmation from the menu (shown below). This will open the Shipping Confirmation screen in a separate window.

To add an order to a truck, click on the order (other than the hyperlinked Order Number) and drag it over the name of the appropriate truck and release it. The order will display below the truck. You can also right-click on the name of the truck and select "Add Order". A window will pop up allowing you to search for the order that you want to add. To expand a truck, click on the ![]() to the left of the truck name, as shown below.
to the left of the truck name, as shown below.

Add a group of orders to a truck by clicking on the first order, holding down your Shift key, and then clicking on the last order in the list. This will select a group of consecutive orders and allow you to drag them to the appropriate truck. You can also choose to select multiple orders by clicking on the first order, holding down your Ctrl key, and then clicking on each additional order that you would like to include in the selection (shown below). All included orders will be highlighted in blue. Then, click and drag one of the blue highlighted orders to the appropriate truck and all highlighted orders will be included.

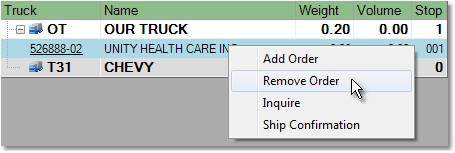
To remove an order from a truck, click on the order under the truck and drag it to the left side of the screen, then release it. You can also right-click on the order under the truck and select "Remove Order" from the menu (shown below). The order will be moved to the left side of the screen and can be placed on a different truck.

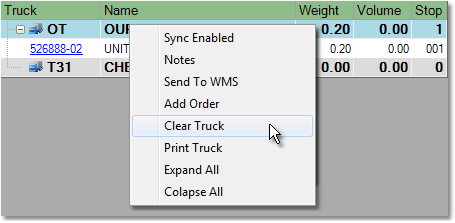
To remove all orders from a truck, click on the name of the truck then click the Clear button in the bottom toolbar. You can also right-click on the name of the truck on the right side of the screen and select "Clear Truck" from the menu (shown below). A window will pop up asking if you want to remove these orders from the truck. Click the OK button to remove these orders from the truck. This will clear the Ship Date on the order(s) and they will appear in the list on the left side of the screen.

To add notes to the manifest, right-click on the name of the truck and select the "Notes" option from the menu. A window will pop up allowing you to enter notes for the manifest. They will print at the top of the manifest.
To adjust Fuel Charges, check or uncheck the FC box to the right of the order. This will add or remove the default Fuel Charge (set in your Company Master) from the order. Set the Miscellaneous Charge Code for Fuel/Delivery Charge and the Fuel/Delivery Dollar Amount in the Company Master, under the Sales tab. If you do not have these fields set in the Company Master (shown below), the checkbox option will not appear.
![]()
Miscellaneous Charge amounts set on the Customer Master will override this charge code and amount.
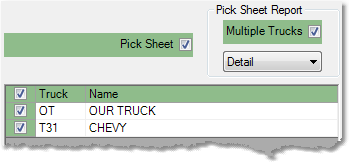
To print the Pick Sheet for multiple trucks, click on the name of a truck on the right side of the screen then click the Print button in the bottom toolbar. In the Print Options window, check off the Pick Sheet option. Check the Multiple Trucks option to the right, then check off the trucks that you want to include in the pick sheet. Choose to print a detail or summary pick sheet from the drop down menu. An example is shown below.

Once you have selected the trucks, click the OK button to print the pick sheet. You cannot print the Truck Manifest or Sales Orders/Ship