![]()

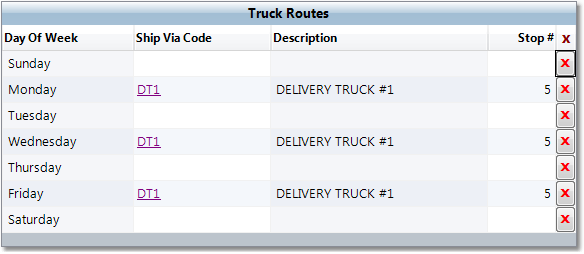
This tab displays the truck routes that you have set to deliver to the customer. When a Sales Order is entered for the customer, the system will automatically assign the earliest possible Ship Date and Ship Via based on the routes available.
In the example shown to the right, orders for the customer will be shipped on Mondays, Wednesdays, and Fridays via Delivery Truck #1. The Stop # is entered as Stop 5, but it can also be left blank. Stop order can be changed at any time during scheduling in the Truck Manifest screen.
If the Ship Via entered is linked to a Truck, the order will automatically appear on the route for the scheduled Ship Date. A Ship Via can be linked to a Truck through the Ship Via screen.
Truck Routes can also be entered on the Ship To level. Routes entered for a specific Ship To will override the route set here.
To edit truck routes
1.Click the Edit button in the bottom right corner of the window, or double-click on any field under the Truck Routes tab.
2.Select the day of the week that you would like to add a delivery route by clicking in the Ship Via Code field for that day. Enter the appropriate Ship Via Code in this field and press Tab, or use the ![]() to search for the correct code. The corresponding description for the Ship Via will display in the Description field.
to search for the correct code. The corresponding description for the Ship Via will display in the Description field.
3.Enter the stop number in the Stop # field. This will determine where the customer's order is placed in the truck manifest. For example, if you routinely deliver hazardous materials to this customer and would prefer they always be the first stop on the route, enter the number 001. If the stop number is negligible, leave this field blank. You may also change this number when you create the Truck Manifest Entry.
4.When you have completed your truck route entries, click the Save button in the bottom right corner of the window to save these entries to the master file.