|
The Truck Manifest screen allows you to assign ship confirmed sales orders to your trucks to be delivered to your customers. This section of the system can be integrated with ePods to enable your drivers to electronically capture customer signatures upon delivery. For help with the new Truck Manifest Beta screen, click here. |
To create a Truck Manifest follow the easy steps below. Once your orders have been scheduled on a truck, you should print a copy of the Truck Manifest for the driver to take with him. You also have the option to print Sales Orders or Shipment Confirmations for each order on the manifest, as a delivery document for the customer. Finally, you can print a Pick Sheet for all of the orders on the truck.
1.Select Warehouse > Truck Manifest.
2.Enter the scheduled delivery date using the drop down calendar in the Schedule Date field.
3.Now enter the reference code for the truck that you want to create the manifest for in the Truck field, then press Tab. You can also use the ![]() to search for the correct truck.
to search for the correct truck.
4.Enter the order number of the sales order that you would like to schedule on the truck route in the Order No field and press Tab. You can also use the ![]() to search for the correct order number.
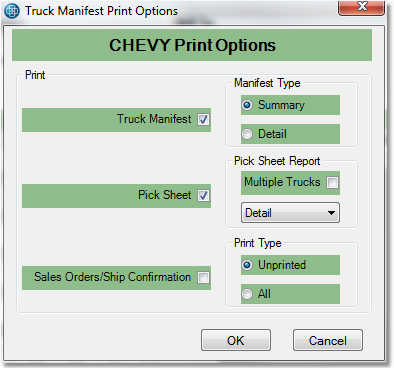
to search for the correct order number.
5.Enter the stop number for the delivery in the Stop field and press Tab.
6.Now, click the Add & Update button to the right. The order will appear in the window. You can then continue to add orders by entering a new order number in the Order No field and following steps 4-6. You can change the stop number for an order by clicking on the order in the window, entering a new stop number in the Stop field, and then pressing Tab. The blue "Totals" bar will display the total weight and volume for the orders scheduled on the truck. Click on any field in the example shown below for more information.

7.Once you have added all of the stops for the route, click the Save button in the bottom toolbar. To view the route again, enter the delivery date and truck.
8. When the route is complete, you need to print the manifest for the driver. You may also want to print the Sales Orders or Shipment Confirmations for the orders on the truck as a delivery document for the customer. To print the manifest, click the Print button in the bottom toolbar, then check off the "Truck Manifest" option. A Summary Manifest will include only the order number and shipping information; a Detail Manifest will include the products and quantities on each order as well. You can also choose to print a Pick Sheet for the entire truck, and the Sales Order or Shipment Confirmation for each order. If the order has not been Ship Confirmed, a Sales Order will print.
If you choose to print the Pick Sheet, you have the option to include only unprinted orders, or to include all orders on the truck. If you are printing multiple copies of this pick ticket over the course of a day, you will most likely want to choose "Unprinted" so that you do not double-pick orders. If you are printing the Pick Sheet only once, you will want to choose "All". The same logic follows for printing Sales Orders or Shipment Confirmations. Note that if you are choosing to print both the Pick Sheet and Sales Orders at the same time, your choice will apply to both.
Once you have checked off your options, click the OK button. In the printer window, select the correct printer and number of copies, then click the Print button. |
|
![]()
