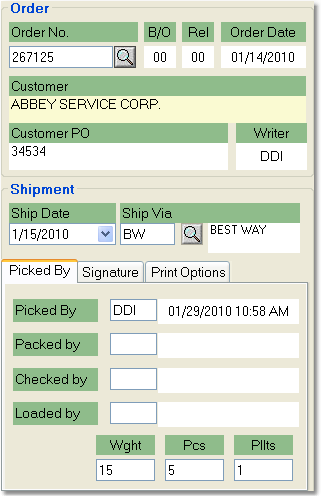
![]() The Shipping Confirmation screen allows you to confirm shipping quantities for sales orders and print delivery documents. It also allows you to monitor when an order is picked, packed, checked, and loaded by a user. You can ship confirm straight from the Sales Order screen after the order is saved and printed by clicking on the Ship Conf button. You cannot ship confirm point of sale orders or sales orders that are on Credit Hold, and you cannot ship items that are tagged "Hold for Inspection".
The Shipping Confirmation screen allows you to confirm shipping quantities for sales orders and print delivery documents. It also allows you to monitor when an order is picked, packed, checked, and loaded by a user. You can ship confirm straight from the Sales Order screen after the order is saved and printed by clicking on the Ship Conf button. You cannot ship confirm point of sale orders or sales orders that are on Credit Hold, and you cannot ship items that are tagged "Hold for Inspection".
To ship confirm an order follow the easy steps below. Once you have confirmed the ship date, ship via and product quantities, the system will prompt you to print the Shipping Confirmation as a delivery document for the customer. If you do not want to print the Shipping Confirmation at this time, click the Cancel button in the printer window. Shipping Confirmations can also be printed in batches from the Truck Manifest screen. For more information, see the Truck Manifest page.
Note: If your system requires that you capture a signature before confirming a pick up or will call order, you must use a computer that has a signature capture device attached. You can also turn off this requirement via a switch under the Images/Signatures/eDocs tab in the Company Master.

1.Select Warehouse > Shipping Confirmation. You can also click the ![]() icon in the toolbar.
icon in the toolbar.
2.Enter the Sales Order number in the Order Number field and press Tab or click on the ![]() to search for the correct Sales Order.
to search for the correct Sales Order.
3.The Ship Date and the Ship Via will display in the Shipment section on the left. Make any changes if necessary. If you have your trucks linked to your Ship Via's, setting the Ship Date and Ship Via will automatically schedule the order to ship on the appropriate truck. If you delete the Ship Date, the system will automatically enter the current date when the confirmation is saved.
4.In the Picked By field, enter the system initials of the user who picked the order and press Tab. These initials are case sensitive so be sure to use capital letters. The date and time will automatically appear to the right of the initials. You can also enter the initials of the users who packed, checked and loaded the order, but these fields are not required.
5.The products and quantities on the order will display to the right. Use this window to enter the quantity that is being shipped and the quantity that is backordered for each item. You can use the Ship All and B/O All buttons in the bottom toolbar to ship or backorder all quantities for all products listed. You can over-ship an item if necessary, but you cannot enter a negative quantity to ship for a positive quantity open. If the order was entered incorrectly, it must be changed in the Sales Order screen before you Ship Confirm it.
Note: For orders that are completely backordered, the system will not allow you to save the shipment confirmation. You cannot ship confirm zero quantity orders. An error message will appear when you click Save and the confirmation will not be saved.
6.The Print Options tab allows you to choose to hide or print prices, backordered items, etc on the printed Shipping Confirmation. These options can be set to default in the Company Master and in the Customer Master if necessary. Click on any field in the example to the left for more information.
7.Once you have entered all of the necessary information, click the Save button in the bottom toolbar. (If you have a signature pad attached to your computer, you may be prompted to capture a signature at this time). This will open the printer options window. From this window, select the appropriate printer and number of copies (this can be defaulted in the Branch Master, under the Printers tab). Click Print to print the confirmation. You can also fax or email this confirmation by clicking the Fax/Email button. For more help faxing or emailing the confirmation, see the Fax/Email Reports page.
If you do not want to print the Shipping Confirmation at this time, click the Cancel button in the printer window. Shipping Confirmations can also be printed in batches from the Truck Manifest screen. For more information, see the Truck Manifest page.
![]()