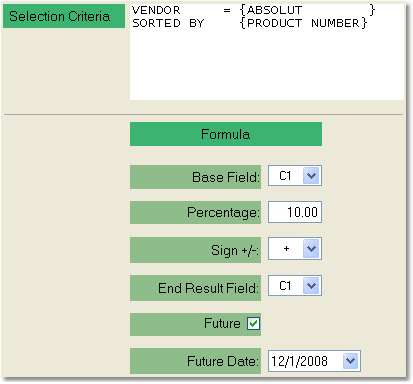
The Price Change by Formula screen allows you to update a cost or price field for a selected group of products. This method should be used when you have a group of products that needs to be changed by a set percentage. Use the Selection Criteria window to select the products you want to include, then choose the field you want to update, and the percentage that field should increase or decrease. The change can be set to update immediately, or to take effect at a later date.
To create a price change by formula follow the easy steps below. Be sure that you select the correct products and price fields, as this process is not reversible. To explain this process, we'll use an example: the vendor "Absolute" has notified you that your cost for all of its products will be increasing by 10%, effective December 1, 2008.
1.Starting from the main screen, select Sales > Pricing > Price Change by Formula.
2.The Selection Criteria window will pop up. Use the options in this window to select the appropriate group of products for your price change update. For more information regarding selection criteria options, see the Selection Criteria page. Once you have entered the necessary criteria, click the OK button. For this example, we've selected all products assigned to the "Absolute" vendor.
3. This will bring you to the Price Change by Formula window. The Selection Criteria section will display the criteria that you used to select your products. Below the Selection Criteria you will see the formula options. These will allows you to set your price update formula. To begin, select the field that you want your formula to be based upon from the drop down menu in the Base Field field. This is the field that will be increased or decreased. Since we are updating cost, and are not using a load, we will select C1.
4. In the Percentage field, enter the percentage amount that you want to add or subtract from the base field, then press Tab. In this case, we want to enter "10".
5. Using the drop down menu in the Sign +/- field, select the "+" or "-" symbol. Since our cost is increasing, we will select the "+".
6. In the End Result Field field, select the field that will be the end result of the formula; in other words, the end result field equals the base field plus or minus the percentage that you enter. Since C1 is the field that we want to change, we'll select C1 here.
7. If your price change is not meant to take effect immediately, check the Future box. The Future Date field will appear below, allowing you to select a date from the drop down menu. If you do not check the Future box, the price change update formula will become effective immediately. We want our formula to become effective on December 1, 2008, so we'll check the box and enter our date.
A completed example of this price update is shown to the right. Click on any field for more information.
8. Once you have entered all of the necessary information, click the Update button in the bottom toolbar. The system notify you when the update is complete. An example of a completed Price Change by Formula is shown to the right. Click on any field for more information. |
|
![]()
