Your customer has a credit on their account and would like you to send them a check for that amount. To do this, you first need to remove the credit from the customer's account through a Cash Receipts adjustment; then you need to print a check for the customer in that amount.
To print a credit check for a customer follow the easy steps below. First, we'll adjust the credit using the Cash Receipts screen, then we'll write the check using the Non Vendor Check screen. Keep in mind that both the adjustment and the check should be posted to the same General Ledger account.
1) Adjusting the Credit
1.Select Accounting > Accounts Receivable > Cash Receipts.
2.Enter the customer in the Account field and press Tab. You can also use the ![]() to search for the correct customer.
to search for the correct customer.
3.In the window, you should see the negative invoice amount of the customer's credit. In order to adjust this, you will need to enter a Check Number and an Amount Received. For the check number, it is helpful to have some denotation that identifies it as a refund adjustment, and to prevent duplicate check numbers. In this example, we'll use the letter "R" and then the invoice number as the check number. For the Amount Received, enter zero and press Tab. An example is shown below.
![]()
4.Now, we want to adjust the credit so that the balance on the invoice is zero; then we can clear it from the customer's ledger. Click in the Adjustment field and enter the same amount as the Balance on the invoice, then press Tab. Now, in the Adjust G/L field, specify the General Ledger account that you want the adjustment to post to; generally, this is an expense account. You may want to write down this account as you will need to use the same account when you print a check for the customer. The Balance field to the right should now show zero. An example is shown below.

5.We can now clear the amount from the customer's ledger by checking off the invoice. The Balance Left in the bottom right corner should read "zero". Then, click the Save button in the bottom toolbar. This will save the posting.
2)Writing the Check
1.Select Accounting > Accounts Payable > Non Vendor Check.
2.Enter the name and address of the customer in the corresponding fields on the left side of the screen.
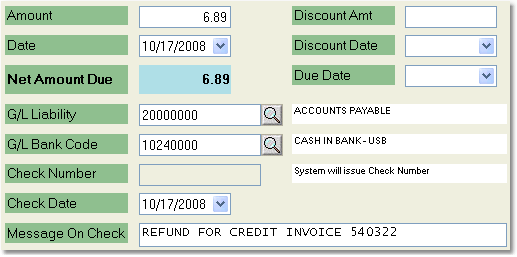
3.Enter the refund amount in the Amount field and press Tab.
4.In the Message on Check field, you may want to reference the invoice number of the credit, so that you and the customer know why they are receiving the check. An example of the completed left side of the Non Vendor Check screen is shown below. The G/L Liability and G/L Bank Code fields will automatically default to the appropriate accounts for your company. Click on any field for more information.

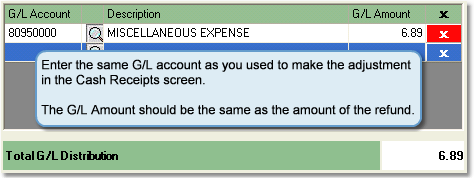
5.Now, in the G/L Distribution window on the right, enter the same G/L expense account that you used to enter the adjustment in the Cash Receipts screen in the G/L Account field and press Tab. In this example, we used the 80950000 - Miscellaneous Expense account, so we'll select the same one for the check. Enter the refund amount in the Amount field, as well. An example is shown below.

6.Then, you can choose to print a check from the system by clicking the Print Check button, or you can choose to hand write a check by clicking the Hand Check Entry button. If you choose to write a check by hand, you will need to enter a check number in the Check Number field before you can save the entry.