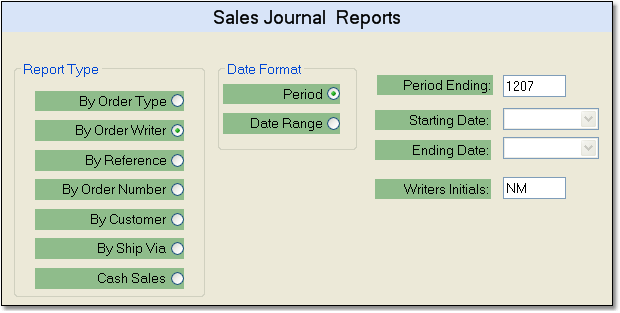
The Sales Journal Reports allow you to customize the Sales Journal information that you would like to view. You can choose the type of Sales Journal Report, then decide if you want the sales journal data organized by Period or Data Range.
These reports run based on the posting date for the order, not the invoice date.
To print a Sales Journal Report follow the easy steps below. Before you print this report, be sure that your printer is turned on and connected, and that you have inserted a sufficient amount of paper into the correct printer tray. You can also choose to view this report on screen.
1.Starting from the main screen, select Sales > Invoice > Sales Journal Report.
2.From the Report Type list on the left, select the appropriate report that you would like to print. Click on any of the reports in the example screen below for more details about what each report includes.

3.Now, select the data format for your report. Period will ask you to submit the ending month and year for the calendar period that you would like to include in the report. Data Range will ask you to submit starting and ending dates for the data to be included in the report.
4.If you chose Period, enter the month and year (MMYY) for the end of the period in the Period Ending field. If you chose Data Range, enter the starting and ending dates for the data range in the Starting Date and Ending Date fields. Sales transactions on these dates will also be included in the report.
5.When you have entered the appropriate information, click the OK button in the bottom toolbar. The printer window will pop-up. From the printer window, select the appropriate printer and number of copies. You may also preview the report before you decide to print it by clicking the View button. This will open a preview of the report in a new window. Click Print to print the report. Remember to check that your printer is turned on and connected, and that you have inserted a sufficient amount of paper into the correct printer tray. You may also fax or email this report by clicking the Fax/Email button. For more help faxing or emailing the report, see the Fax/Email Reports page.
![]()