Recurring orders can be used when your customer places the same order on a weekly, monthly, quarterly, semi-annual, or annual basis. When a recurring order is saved, it serves as a placeholder in the system and is not filled as a Sales Order until the first time that it is set to recur. These placeholders will not appear when searching for Open Orders in Sales Order Inquiry or the Customer Ledger. Instead, search for Recurring Orders to find them.
For example, when you enter a monthly recurring order in January, the first order that can be filled will be created in February. If you need to fill an order for January as well, you can create a regular Sales Order for that month.
Orders that are automatically created use the same Customer PO Number, Ship Via and Shipping information as the original order. The Special Instructions box on the orders that are automatically created will indicate the time period that they were created for (ex. "Week of Tuesday 1/08/2011" for a weekly order). These orders do not print automatically. You may want to schedule an event or task on your calendar to remind yourself to print the Sales Order when it is created.
Recurring orders are created with a blank Ship Date. If the customer or Ship Via has a default Truck Route entered, the Ship Date will populate based on this schedule. If there is no truck route available, the Ship Date will remain blank until it is scheduled on a truck or Ship Confirmed.
To stop a recurring order before its expiration date, simply cancel the recurring order. This will not affect any Sales Orders that have already been created by the order.
You can also choose to schedule individual line items for recurring order delivery. Control the quantity, Committed Date and Ship Date of each line item separately. An order will be created with only the specified products and quantities set to ship on the next day. For more information, follow the instructions below.
To enter a recurring order follow the easy steps below. Remember that this recurring order is only a placeholder in the system. If you need to ship out the order today as well, enter a regular Sales Order in addition to the recurring order. When a recurring order is created, any users in the Sales Manager group, set in the User Master, will receive a mail message notifying them that the order had been created.
1.Select Sales > Order > Sales Order. You can also click on the Sales Order icon in the toolbar ![]() .
.
2.Enter a Customer number or part of the customer name in the Customer field and press Tab. Click on any field in the example below for more information.

3.The system will automatically enter the customer's default information into the Ship To, Ship Via, Salesman, Terms, and Tax Code fields. Please verify that this information is pertinent to the current order before continuing. You can select the appropriate Ship To from the drop down menu, or click the Manual button to enter a new shipping address.
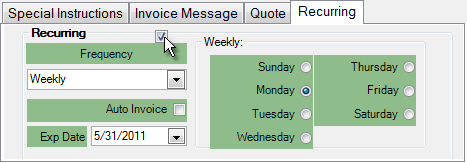
4.On the right side of the screen, click on the Recurring tab and check off the "Recurring" box (shown below).

5.Choose how often the order should recur from the drop down menu under Frequency. Options include:
| Weekly - For weekly recurring orders, choose the day of the week that the order will be created from the options to the right. The first order will be created on that day, ex. if it is Monday and you enter a recurring order for Wednesday, the first order will appear in the system that Wednesday. |
Monthly - Monthly recurring orders are triggered by the closing of your month.
Quarterly - These recurring orders are created once a quarter.
Semi-annually - These orders are created every 6 months.
Yearly - Yearly recurring orders are triggered by the closing of the last month of the year.
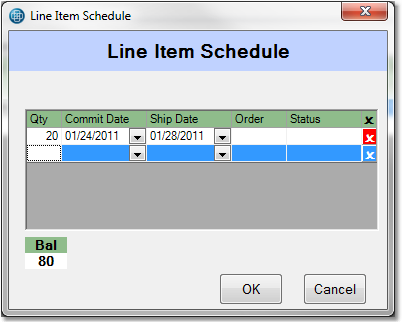
Line Item Scheduled - Each line item is scheduled for the ship date and quantity that will be created on a Sales Order. When you add a product to the order and enter the total quantity to be shipped, a box will pop up asking you to specify the dates and quantities that should be delivered. An example is shown later in these instructions.
6.Click on the Detail tab and enter the products, quantities and prices for the order. If you selected Line Item Scheduled for your frequency, continue to step 7. If you selected another option, you can skip to step 8.
7.Once you enter the item and quantity and press Tab, a window will pop up asking you to schedule the quantities (shown below). In the example below, the total quantity ordered is 100. the first quantity of 20 will be committed on 1/24/2011 and shipped on 1/28/2011. The order will be created in the system on the committed date. Once the order is created, the Order Number and Status fields will update automatically. You can make changes to the quantities and dates until the order is created in the system. You do not need to schedule the entire quantity when the recurring order is created; changes can be made to Line Item Schedule at any time by right-clicking on the product and selecting "Line Item Schedule" from the drop down menu.

8.Click the Save button in the bottom toolbar to save the order. Since this order serves as a place holder in the system, you cannot print a pick ticket for it. If you need to pick the order today as well you should enter a separate Sales Order. Click the Recurring Order button to print a copy of the order.