If you are using the Branch G/L Suffx option to create separate G/L Accounts for each branch, you can create a separate Income Statement for each branch, in addition to your consolidated Income Statement, which should include all branches.
First, you need to create G/L Groups that include only the accounts for that branch. These groups should be named to reflect the branch that they apply to, such as "Sales Merchandise - Service". Each branch-specific account should be included in both the branch-specific G/L Group, and the G/L Group for the Consolidated Income Statement. Also, all Income Statement accounts need to be included in an "Income Summary" group for the Balance Sheet.
Creating Branch-Specific G/L Groups
You need to create branch-specific G/L Groups that you can use to build a branch-specific Income Statement. Look at the groups included in your initial Income Statement report. The groups that you create should mirror the groups that you see on this report. For example, if you have a "Sales Merchandise" group on your Income Statement, you should create a "Sales Merchandise - Service" group to include only the sales G/L accounts for the Service branch.
To create a group, select Accounting > General Ledger > G/L Group. In the bottom toolbar, click the New button. Enter a reference code and description. Then click the Save button. Once you have created all of the groups, you can assign the necessary accounts to each group.
Grouping Your Branch Accounts
Once you have created the G/L Groups for the accounts, you need to go through your G/L Accounts for the branch and assign each Income Statement account to a group. Any accounts that are not assigned to a group will not be included in the report and the net income will not be correct.
To add accounts to a group, select Accounting > General Ledger > G/L Group. Open the first group that you want to change and click the Edit button in the bottom toolbar. In the window in the bottom left corner, enter the G/L Account that you want to assign to this group and press Tab. Continue assigning G/L Accounts until you have entered all of the necessary accounts for the group. Then click the Save button in the bottom toolbar.
Repeat this for each group. Be sure that you have assigned all accounts for the branch to a group. If you miss an account, your total will be incorrect.
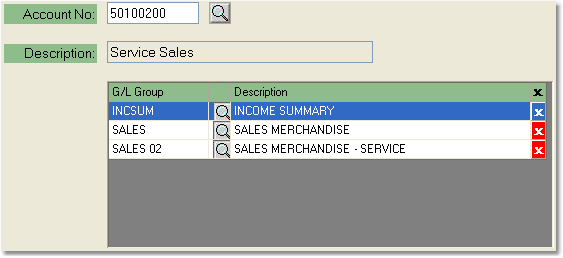
The branch accounts that you assign to a branch-specific group should belong to at least 3 groups: one for the branch-specific Income Statement, another for the Consolidated Income Statement, and a third for the "Income Summary" group that will be used on the Balance Sheet. An example is shown below.

Using Branch Groups to Create a Branch-Specific Income Statement
Once you have assigned all of the Income Statement accounts for the branch to a G/L Group, you can begin constructing your branch-specific Income Statement, using your Consolidated Income Statement as a guide. All of your branch-specific Income Statements should mirror your Consolidated Income Statement using branch-specific groups instead of the company-wide groups.
To check that you have created your Income Statements correctly, run an Income Statement for each branch, as well as a consolidated Income Statement. The sum of the branches should equal the Consolidated Income Statement. If there is a discrepancy, check to be sure that all of your accounts are assigned to the correct groups.
For more information on creating Financial Reports, see the Create and Print a Financial Report page.
![]()
Create and Print a Financial Report
Multi-Branch General Ledger Setup