Before you begin creating financial reports, you should verify that your G/L Groups are set up correctly. Only G/L Groups can be included in financial reports. Every G/L Account should be assigned to a G/L Group. You need to verify that all of your General Ledger Accounts are assigned to the correct group or your report totals will not match. To print a report of your General Ledger Accounts to verify that each account is assigned to a group, go to the G/L Account screen and click the Report button in the bottom toolbar.
For help using the %REV field to add a Percentage of Revenue column to the report, see the Adding Percentage of Revenue to the Report page.
If you are creating branch-specific reports (such as a branch-specific Income Statement), see the Creating Branch-Specific Financial Reports page.
To create and print a financial report follow the easy steps below. Once the report has been created and saved you can go back and print it any time from the financial reports screen. The example shown below is a Balance Sheet.
1.Select Accounting > General Ledger > General Ledger Inquiry and click on the Financial Reports tab in the upper left corner.
2.In the bottom toolbar of the financial reports screen, click the New button.
3.Enter a name for the report in the Report field and press Tab. A "New Record" flag will appear to the right of the name. If you enter a name that is already assigned to a report, the system will display the information for that report.
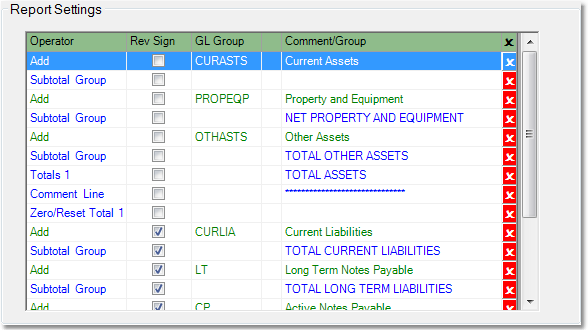
4.Click on the Setup tab, then click on the Report Settings tab. Now you need to enter the General Ledger groups, totals, and comment lines that will be included in the report.
5.To add a line to the report, first select the type of line from the drop down menu in the Operator field. You have several options to choose from in this field:
-Add - adds the values in the selected G/L Group to the report. Choose this option, then enter the group in the GL Group field and press Tab.
-Subtract - subtracts the values in the selected G/L Group from the report. Choose this option, then enter the group in the GL Group field and press Tab.
-Subtotal Group - totals the values for any groups listed directly above this line. Including another Subtotal Group line after the first will subtotal only groups listed between the first and second subtotal on the report.**
-Grand Total - totals the values for all Subtotal and Totals listed above this line. If you want to insert multiple Grand Total lines into a report, use a Zero/Reset Total line directly after the Grand Total.**
-Totals1-9 - totals the values for any Subtotal Groups listed directly above the line. Including another Total line after the first will total only subtotals listed between the first and second total on the report.**
-Zero/Reset Total 1-9 - resets the running total to zero. This line should be inserted directly following a Grand Total line if you would like to include multiple Grand Totals on the report.
-Comment Line - a blank line that can be used to enter a heading or break in the report. After selecting Comment Line, enter your text in the "Comment/Group" field.**
**these totals and subtotals can have descriptions entered for them in the Comment/Group field after they have been selected.

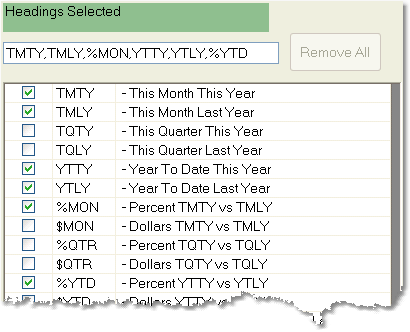
5. Now click on the Column Headings tab. Select the headings that you would like to include in the report by clicking on the box in the far left column so that it displays a check mark. The abbreviation for the heading will appear in the Headings Selected field above the window. An example is show to the right. Note: If you select the % REV heading, be sure that you have checked off your revenue groups in the G/L Group screen. If you have not, this will show as 0. If you check the %REV field again, you will be asked if you want to add it to the report again or delete the previous entry.
6. Finally, click the Save button below the window.
7. You can now print the report by entering the name of the report in the Report field and pressing Tab.
8. Under the Report tab, enter the desired calendar period for the report in the Calendar Period field and press Tab. The system will automatically enter the corresponding fiscal period. You can also choose to enter the appropriate fiscal period in the Fiscal Period field and press Tab. The system will then enter the corresponding calendar period.
9. Choose to print a Summary or Detail report from the Summary/Detail drop down menu. If you choose to print a detail report, you can also choose to show the individual General Ledger accounts by checking the Show G/L Account box.
10. Finally, click the OK button. This will create an Exceptions tab and a tab with the name of the report that you are running. The Exceptions tab displays any ungrouped General Ledger accounts. Click on the account number hyperlink to open the G/L Account screen and link the account. You can then re-run the report.
|
|
To view the report, click on the tab with the name of the report. Click on any of the hyperlinked groups or accounts to view transaction details under the G/L Inquiry tab in the top right corner of the screen. You can return to the report by clicking on the Financial Reports tab at the top of the screen.
To print the report, click on the Report button. From the printer window, select the appropriate printer and number of copies. You may also view the report on screen before you decide to print it by clicking the View button. This will open a preview of the report in a new window. Click Print to print the report. Remember to check that your printer is turned on and connected, and that you have inserted a sufficient amount of paper into the correct printer tray. You may also fax or email this report by clicking the Fax/Email button. For more help faxing or emailing the report, see the Fax/Email Reports page.
To export the report, click on the Export button. Name the file and choose a location to save it, then click the Save button.
