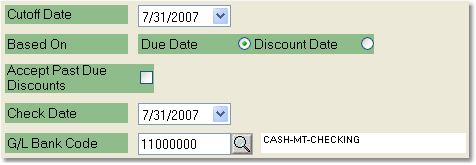
The Accounts Payable Scheduled Checks Report will display all of your scheduled checks for a selected bank account.
To print the Accounts Payable Scheduled Checks Report follow the easy steps below. As this is a printed report, be sure that your printer is turned on and connected, and that you have inserted a sufficient amount of paper into the correct printer tray before you begin.
1.Starting from the main screen, select Accounting > Accounts Payable > Scheduled Checks Report.
2.Enter the cutoff date for the check run in the Cutoff Date field.
3.Choose to view checks included in the report based on the due date of the invoice or the discount date in the Based On field.
4.If you would like to accept discounts that are past the due date, click the box next to this option.
5.Enter the date that appears on the check in the Check Date field. |
|
6. The system will automatically enter the default G/L Bank Code and display the account name. To change this click within the field and enter the correct code. If you are unsure of the correct code, use the ![]() to search.
to search.
7. Finally, click the Report button in the bottom toolbar. The printer window will pop up. Select the correct printer and number of copies, then click the Print button. You can also choose to view the report on screen by clicking the View button. You can also fax or email this report by clicking the Fax/Email button. For more help faxing or emailing the report, see the Fax/Email Reports page.
![]()
