To enter an invoice follow the easy steps below. These steps are designed to help you enter a typical invoice into the system. For more information click on any field shown. If the invoice was already paid for using a credit card, see the instructions to Enter an Invoice Paid on a Credit Card. If you are prepaying for merchandise that you have not received, see the instructions to Enter an On Account Invoice.
Note: If you need to change the Accounting Period on the invoice to post it to a previous accounting period, there is a flag in the Company Master that must be enabled to allow changes. The "Allow Accounting Period change in A/P Entry?" flag, under the Accounting tab in the Company Master must be set to Y to allow for changes to this field.
1.Select Accounting > Accounts Payable > Invoice Entry.
2.Enter the Vendor Number in the Pay To Vendor field and press Tab. This is the vendor that filled the Purchase Order and sent you the invoice. The Remit To Vendor field will automatically populate based on the Vendor Master setting. In most cases, it will be the same as the Pay To Vendor, but it may be different if you have already paid the invoice using a credit card (for more information see the Enter an Invoice Paid on a Credit Card instructions), or if you typically send payment to a different company. The Remit To Vendor is the vendor that the invoice will display under as an open invoice.
3.Enter the invoice number in the Invoice Number field and press Tab. If the vendor does not provide an Invoice Number, you can enter your own for reference. Invoice numbers cannot be duplicated for vendors.
4.Click on the ![]() in the P/O Or Reference # field to search for the stock receipt that corresponds to this invoice. If merchandise was received, you must link the invoice to its purchase order to complete the P/O. You can link multiple receivings to a single invoice, if necessary. If this invoice does not have a purchase order associated with it (such as an electric or telephone bill), you can also use this field to enter any reference information.
in the P/O Or Reference # field to search for the stock receipt that corresponds to this invoice. If merchandise was received, you must link the invoice to its purchase order to complete the P/O. You can link multiple receivings to a single invoice, if necessary. If this invoice does not have a purchase order associated with it (such as an electric or telephone bill), you can also use this field to enter any reference information.
For customers using Line Item Cost Validation: any receivings that display in red cannot be linked to the invoice because they contain items with a cost variance. For instructions on reconciling the variance to complete invoice entry, see the A/P Line Item Cost Validation page.
5.Enter the Invoice Date. The system will use this date to calculate the Discount Date and Due Date for the invoice, based on the vendor's payment terms.
6.Enter the total amount of the invoice in the Gross Amount field and press Tab. This includes freight and tax amounts.
7.Enter the shipping charge in the Freight Amount field and the tax charge in the Tax Amount field. You can enter detailed freight information by right-clicking in the freight field and selecting Detail... and then entering the freight charges and descriptions.
If you need to enter a Third Party Freight charge, you can do so through the Stock Receipts screen.
The Merchandise Amount and Balance Due will be automatically calculated based on your entries. The Merchandise Amount should match the amount in the Linked Receipts field before you save.

8.The system will automatically calculate the Discount Amount, Discount Date and Due Date based on your terms with the vendor. If you pay the invoice in time to qualify for the discount, the system will automatically recalculate the General Ledger entry to reflect it.
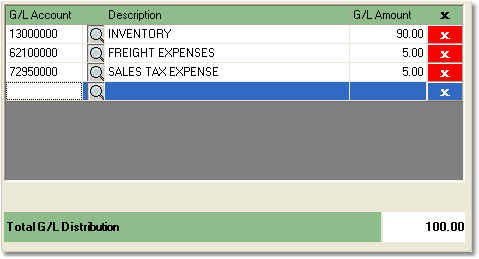
9.Now, look to the General Ledger Distribution window on the right side of the screen. This will display the General Ledger Accounts that will be affected, and the amounts that will be posted to them. The Total G/L Distribution must equal the Gross Amount before the invoice can be saved. An example is shown below.

10.Once you have verified that the information is correct, click the Save button in the bottom toolbar to save the invoice to the system.