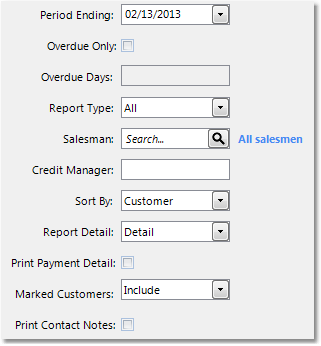
The Accounts Receivable Aging Report displays all open AR invoices categorized by Aging Date. This report can be used to see how much is owed to your company by your customers and to detect invoices that are past due. Company Grand Totals are also available at the end of the report. The report also includes aging days. The AR Aging Report should be run as part of the End of Month Closing process and saved as a PDF or Excel Spreadsheet. For more information see the End of Month Closing page.
The columns of the report may be adjusted to include a 45 Days aging column. Inserting this column removes the 120 & Over column and renames the 90 Days column to reflect 90 Days & Over. Enable this feature in the Company Master, under the Accounting tab by entering a "Y" in the A/R 45 Days Aging Column field.
Click on any field in the screen image shown for more information.
Run the Accounts Receivable Aging Report
1.Select Accounting > Accounts Receivable > Aging Report.
2.The system will automatically enter the current date in the Period Ending field. All open invoices prior to this date will be included. To change this date, select the appropriate date from the drop down menu or type a new date into the field.
3.Enter information in the following fields to customize your AR Aging Report. Click on any of the fields in the example to the left for more information.
4.The system will automatically select Customer in the Sort By field. You can also sort by Salesman or Credit Manager. Note that this will only change the manner in which the information is organized, not which invoices are included in the report.
5.The system will automatically select Summary in the Report Detail field. This will display the total dollars owed to you by each customer categorized by the different aging columns. You can also select to print a Detail report, which will display the aging information for each outstanding invoice.
6.The system will automatically select Include in the Marked Customers field, which will include marked customers in your report. You may also select Suppress, which will exclude marked customers, or Only, which will include only marked customers in your report.
Click on any field in the example below for more information.

7.When you have entered the appropriate criteria, click the Run button to run the report.
•Print - select the appropriate printer and number of copies. If you do not see the printer listed, check off the Show All Printers box to view all Inform printers. Check the Collate box to collate the report when printing more than one copy. Click the Print button to print the report.
•View - click the View button to view the report to the screen.
•Save as PDF - click the View button to view the report to the screen. In the upper left corner of the view window, select File > Save As... from the menu. Browse to a location to save the document. Enter a name for the document. Click the Save button to save the document as a PDF.
•Export - click the Export button. In the pop up window, browse to a location to save the document. Enter a name for the document. Click the Save button to export the spreadsheet. You can then browse to the file location to view the document.
•Fax/Email - click the Send button. Choose Fax or Email from the drop down menu in the upper left corner of the window. If you want to send this to a Customer or Vendor contact, choose Customer or Vendor from the Method drop down menu and enter the company name in the Company field. Select the appropriate contact from the Name drop down menu, or click the New button to add a new contact to the account. If you are not sending to a customer or vendor, choose the Free Form option and enter the appropriate fax number or email address. Enter a Subject and Body message if necessary, then click the Send button in the bottom right corner. See the Fax/Email Reports page for more information.
![]()