Additional documents, such as image files or pdf's can be attached to the customer's payment. These attached documents can then be accessed through the Customer Ledger under the Paid Invoices or Payment History tabs.
To add an attachment to a customer payment follow the easy steps below. First you will need to enter the customer and payment information, then you will need to select the appropriate file to attach and save the posting.
1.In the Cash Receipts screen, enter the Customer Number or Customer Name in the Account field and press Tab. You can also click on the Find A/R... button to search by Invoice Amount, Invoice Number, or Customer P/O.
2.Enter the payment information in the Check area in the upper right corner of the screen. (Note: If you are posting a Credit Card Payment, see the Post a Credit Card Payment instructions).
-The G/L Bank Code will default to your account that will accept the deposit. Changing the Bank Code will start a separate batch. You can build multiple Cash Receipts batches at once and then post them individually.
-The Posting Date will default to the current date. Changing this date will only reflect in the Bank Ledger, which you can use to reconcile your bank statement. It will not affect the General Ledger.
-Enter the Check Number for the check (up to 15 characters). The system will not allow you to enter duplicate check numbers for the same customer.
-Enter the amount of payment received in the Amount Received field and press Tab.
3.Once this information has been entered, click the Attachments button in the bottom right corner of the screen. This button will not become enabled until you have entered the customer and payment information.
4.In the pop-up window, click on the New button (shown below).

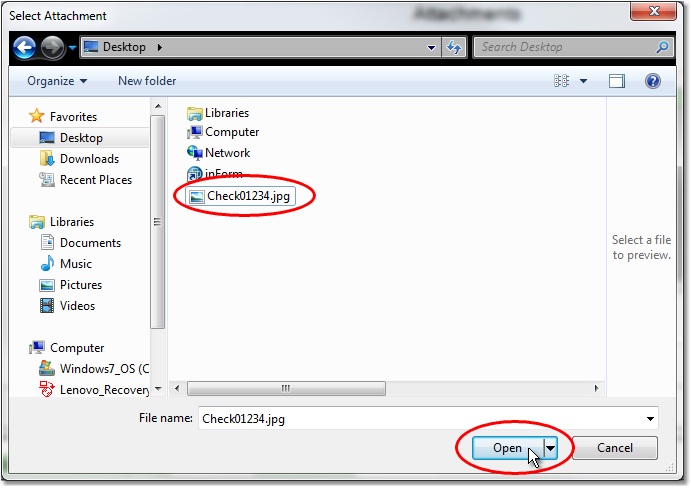
5.Browse to the file that you would like to attach in the Select Attachment window (shown below). Click once on the file, then click the Open button to attach the file.

6.The file will display as a link in the attachments window. Attach as many files to the payment as necessary using steps 4 and 5. When you have attached all of the necessary files, click the Exit button to return to the Cash Receipts screen.
7.Complete the posting by applying the payment to the appropriate invoices. See the Post a Customer Cash Receipt instructions for more information.