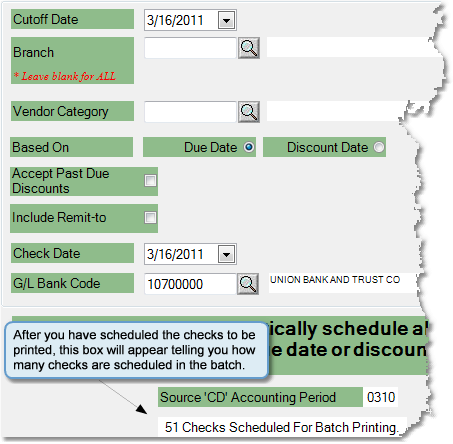
To schedule checks follow the easy steps below. This procedure will automatically schedule all invoices ready to be paid based on the invoice due date or the discount date. Once the checks are scheduled, you can print them from the Check Print screen. Checks with a balance of zero will not be printed. For more details regarding a specific field, click on the name of the field in the image below.
|
1.Select Accounting > Accounts Payable > Schedule Checks.
2.Select the period Cutoff Date for your checks. This cutoff date can be based on the Due Date or the Discount Date, which you can select from the Based On field. All invoices with a Due/Discount Date on or before your Cutoff Date will be included in the batch.
3.If you would like to include discounts that are past the due date, click the box next to this option.
4.Check the Include Remit-to box if you would like to include invoices with Remit-to vendors in the batch. For example, if you paid a vendor by credit card, the Remit-to vendor on the invoice would be your credit card vendor, since they will be receiving your check.
5.Enter the date you want to appear on the check in the Check Date field.
6.The system will automatically enter the default G/L Bank Code and display the account name. To change this click within the field and enter the correct code. If you are unsure of the correct code, use the
7.Once you have entered this information, click Schedule and your selected checks will be scheduled for printing. The printer window will pop up so that you can print or view a report of the checks scheduled.
8.Review the report to be sure that all invoices included in the report should be paid. You can now make any changes to the batch through the Check Print screen (Accounting > Accounts Payable > Check Print), or print the batch through the Check Print screen by clicking the Print Batch button in the bottom toolbar. |
![]()
Print a Scheduled Checks Report
